
Do not even hesitate, you have to bake yourself! Keep traditions, knead with your hands. Add raisins, lemon zest, saffron water, and love. To life, to people, to what you do. And for whom. To add laughter and tears of happiness. Walk on tiptoe. Enjoy the moment. The towel is the whitest one, starched by mom out of old habit. With lace or plaid. The dough breathes. It grows every minute. You worry. I made a wish: if Easter paskas will turn out well, then it will be a good year. There is a long night ahead, if you bake for the whole Odessa family, friends, and neighbours, you will get the last one at midnight, not earlier. And now hurry to sleep. Tomorrow is a sacrament. Decorations. Create a hat out of egg whites and sugar. The most delicious is the top. You brush and think: can it all be put on a whites’ icing? No, don’t. Some things are good in moderation. Too much of a good thing can become a bad thing. Then carefully into the basket and to the church. I bake every time as if it is the first. But if everything works out, there it is – happiness. And the aromas? And in the eyes? And in the eyes of those to whom you present? And then you choose which one to eat today. They are so beautiful, sorry. And for two weeks afterwards there is always a delicious tea. And you think it’s early Easter, so the swimsuit season is far away. And in general, now one-piece swimsuits are in fashion. And you butter it. And you know, maybe you cannot change the world, but you can definitely make it more sincere and kinder. Good things come to those who bake.
 Do not even hesitate, you have to bake yourself! Keep traditions, knead with your hands. Add raisins, lemon zest, saffron water, and love. To life, to people, to what you do. And for whom. To add laughter and tears of happiness. Walk on tiptoe. Enjoy the moment. The towel is the whitest one, starched by mom out of old habit. With lace or plaid. The dough breathes. It grows every minute. You worry. I made a wish: if Easter paskas will turn out well, then it will be a good year. There is a long night ahead, if you bake for the whole Odessa family, friends, and neighbours, you will get the last one at midnight, not earlier. And now hurry to sleep. Tomorrow is a sacrament. Decorations. Create a hat out of egg whites and sugar. The most delicious is the top. You brush and think: can it all be put on a whites’ icing? No, don’t. Some things are good in moderation. Too much of a good thing can become a bad thing. Then carefully into the basket and to the church. I bake every time as if it is the first. But if everything works out, there it is – happiness. And the aromas? And in the eyes? And in the eyes of those to whom you present? And then you choose which one to eat today. They are so beautiful, sorry. And for two weeks afterwards there is always a delicious tea. And you think it’s early Easter, so the swimsuit season is far away. And in general, now one-piece swimsuits are in fashion. And you butter it. And you know, maybe you cannot change the world, but you can definitely make it more sincere and kinder. Good things come to those who bake.
All the work, all the time spent, all the burns and nerves on the subject of whether the yeast is fresh, are worth it for a fragrant miracle to be born. So that the “snotty” whites turn into a shiny snow-white mass as if the embodiment of fantasies, and crystallized flowers (by the way, it’s so easy to do it yourself) find an ideal place. The dough loves hands, good mood and bright thoughts. And while I’m kneading it, a couple of funny songs get there, my smile, one crystal castle, a lot of children’s laughter, hope for a bright future and belief that everything is possible, a few Odessa jokes, the singing of local birds, pleasant memories and love, of course 😊 And also more than cooking and decorating, I love giving them as a present! And a pleasant surprise in the eyes of people is my small contribution to making the world a little kinder 😉
For sourdough version please tap there
- Prep time: 2 hours + 3-7 hours’ proving, time to make merengue, crystalize flowers and decorate
- Cook time: 1 hour
- Makes: 10-15
- Difficulty: challenging
- Course: pastry
- Cookware: baking dish, egg separator, kitchen scales, Kitchen Aid stand mixer, silicone baking sheets, pastry bag with nozzles, copper bowl, cooling rack
- Cuisine: Odessa
Ingredients
- 1 kg flour
- 400 g butter, room temperature
- 400 g sugar
- 10 egg yolks
- zest of 1 lemon
- seeds of 1 vanilla bean or 1 tsp vanilla paste
- a pinch of saffron
- 300 g raisins, mix golden and dark
- butter for greasing
- semolina for sprinkling
For the dough:
- 35 g dry yeast or 100 g fresh yeast
- 500 ml whole milk
- 1 tbsp sugar
- 1 tbsp flour
For the icing:
- 2 egg whites
- 450 g icing sugar
- juice of ¼ lemon
For the French meringues:
- 3 egg whites
- 120 g caster sugar
- gel food colouring
For the crystallized flowers:
- 10 fresh violets
- 1-1½ tbsp icing sugar
- 1 egg white
For the decorations:
- sugar pearls, two sizes
Cooking method
For the crystallized flowers:
Step 1
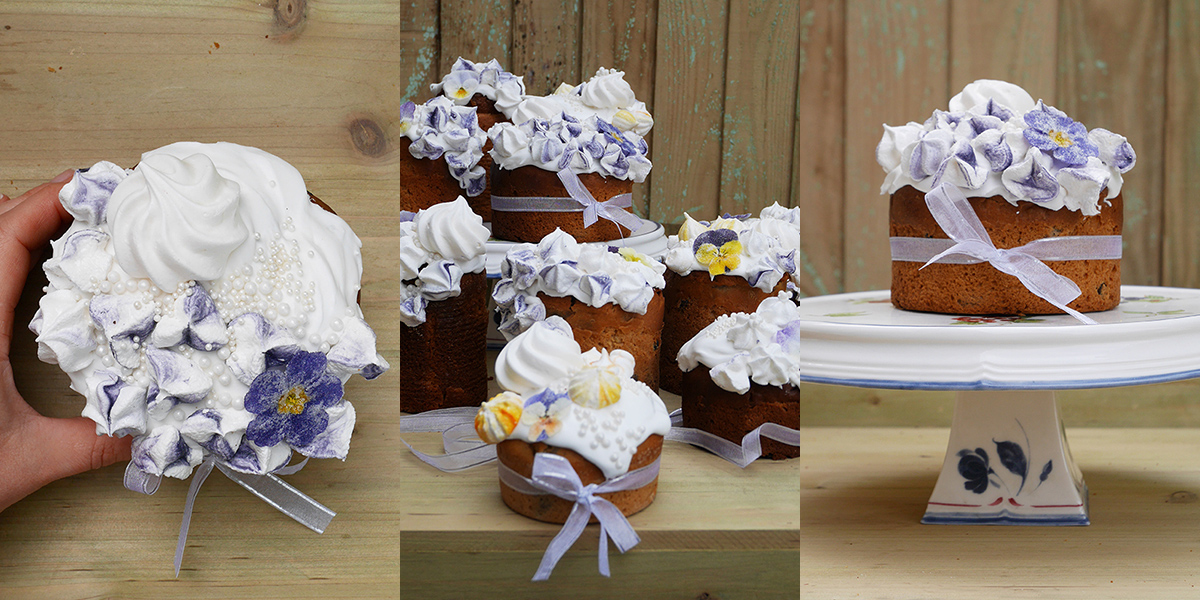
 Whisk the egg whites until a light foam. Brush clean and dry fresh flowers with egg whites, completely covering each petal. Then gently dip the flower into icing sugar and sprinkle with icing sugar on all sides. Arrange the flowers separately from each other, heads down, on a china dish or baking paper. Dry for 24 – 36 hours in a warm room. Once the flowers are completely dry, they can be carefully placed in a sealed container and stored for up to two months in a dry place at room temperature. Crystallized flowers are afraid of light, moisture, and cold.
For the merengues:
Step 2
Heat oven to 160˚С. Use eggs at room temperature, this way the whites will absorb more air and the meringue will be more stable. Eggs should be a week old or more, then the whites will be drier and whisk easier. Bowl for whisking should be grease free and wiped dry. You can degrease the bowl by wiping it with a slice of lemon. Carefully separate the whites from the yolks, not allowing the yolks to get to the whites. You can use your hands, passing the whites among your fingers (in this case, you need to thoroughly wash your hands, grease is our enemy). Whisk egg whites with a mixer on low speed until soft peaks. While increasing the speed of the mixer, add sugar one teaspoon at a time. Sugar serves as an abrasive that helps the merengue whisk better. Whisk until fluffy, snow-white, glossy. There is no need to wait until the sugar is completely dissolved. To check how much the sugar has dissolved, you can take the egg whites mixture and rub it between your fingers to make sure that the sugar is practically dissolved. It’s important not to over-beat the whites. It is easy to check if meringue is ready: if you turn the bowl over, the mixture remains in it.


Step 3
Put a pastry bag with a nozzle on the glass. Using the gel food colouring, draw vertical lines from the nozzle and up with a brush. The more lines and the thicker they are, the more intense the meringue colour will be. It’s important not to overdo it. Fill the bag with the egg whites mixture and pipe the meringues on a silicone sheet or parchment paper. It is advisable to make the meringues the same size so that the drying time coincides. Reduce the temperature in the oven to 100˚С, put the meringues and dry them for 2-3 hours until tender. Drying time depends on many factors, including humidity in the room. You can turn off the oven after 3 hours, slightly open the oven door, and leave the meringues overnight. You can make them in advance, they can be stored in an airtight container for up to one month.


For the paska:
Step 4
Pour a pinch of saffron with 1 tsp warm water. Let it brew. Sprinkle the raisins with flour and mix. Remove the zest from the lemons. Set aside.

For the poolish:
Step 5
Heat the milk a little (no higher than 45°C, otherwise the yeast will die), dissolve the yeast in it, add a spoonful of sugar and a spoonful of flour, stir and leave a poolish in a warm place to prove.

Step 6
Separate the yolks from the whites (you can use the yolks left over from the meringue). Melt the butter. Beat the yolks with sugar until white, pour in warm (not hot butter), mix well. Add vanilla, saffron water, and lemon zest.


Step 7
Check the poolish: it should be growing, increasing in volume. If the yeast is working, add the dough to the egg-butter mixture and mix. If not, then you need to make a new dough starter. Sift flour and add to egg-butter mixture. Start kneading the dough. Add raisins midway through the process. If you knead the dough with your hands, it will take at least an hour. At first, the dough will be thin, but don’t be tempted to add flour. As you knead, the dough will become more elastic and come off your hands. It will still stick to your hands, but it will become denser and more even and begin to take shape. Cover the dough with cling film and leave in a warm place. Proving may take 3 to 7 hours. The dough is buttery and will rise slowly. The mass will increase by about a third. The cling film on the container will swell slightly from carbon dioxide – this means that the process is underway. If not, then you need to make a new poolish.


Step 8
Heat oven to 160˚С. Butter the ramekins and sprinkle with semolina. When the dough has increased by one third, knead it and pour it into the ramekins to about two thirds full. Place the ramekins with dough in a warm place for proving. The dough should increase by another third. Bake the paskas for 40-50 minutes. Take out the paskas from the ramekins and put them on a cooling rack.
For the icing:
Step 9
Pour the icing sugar into a high container. Add egg whites and lemon juice. Whisk with a mixer on high speed. The icing should be thick and not lose shape. If you would like to make the drip icing, reduce the amount of sugar, and add it gradually while whisking to adjust the thickness.

Step 10
When the paskas have cooled, top them with icing. Decorations (meringues, flowers, and sugar pearls) should be places while the icing hasn’t set. Paskas stay fresh for a very long time. They are most delicious on the second or third day after baking.
My tips and tricks:
 Not only the baking time, but also the colour inside and even the taste depends on the dish in which you will bake the paska. The fastest and most convenient way is to bake paska in paper disposable forms. But if you want them to be resemble those that grandmother used to bake, as if baked in a stone oven, take ceramic or thick tin moulds. If your oven heats up unevenly, and sometimes baked food is a little bit browner on one side than on the other, then ceramic or tin moulds will solve your problem. The properties of the materials from which they are made allow to distribute heat evenly.
- 1 kg flour
- 400 g butter, room temperature
- 400 g sugar
- 10 egg yolks
- zest of 1 lemon
- seeds of 1 vanilla bean or 1 tsp vanilla paste
- a pinch of saffron
- 300 g raisins, mix golden and dark
- butter for greasing
- semolina for sprinkling
- For the dough:
- 35 g dry yeast or 100 g fresh yeast
- 500 ml whole milk
- 1 tbsp sugar
- 1 tbsp flour
- For the icing:
- 2 egg whites
- 450 g icing sugar
- juice of ¼ lemon
- For the French meringues:
- 3 egg whites
- 120 g caster sugar
- gel food colouring
- For the crystallized flowers:
- 10 fresh violets
- 1-1½ tbsp icing sugar
- 1 egg white
- For the decorations:
- sugar pearls, two sizes
- Whisk the egg whites until a light foam. Brush clean and dry fresh flowers with egg whites, completely covering each petal. Then gently dip the flower into icing sugar and sprinkle with icing sugar on all sides. Arrange the flowers separately from each other, heads down, on a china dish or baking paper. Dry for 24 - 36 hours in a warm room. Once the flowers are completely dry, they can be carefully placed in a sealed container and stored for up to two months in a dry place at room temperature. Crystallized flowers are afraid of light, moisture, and cold.
- Heat oven to 160˚С. Use eggs at room temperature, this way the whites will absorb more air and the meringue will be more stable. Eggs should be a week old or more, then the whites will be drier and whisk easier. Bowl for whisking should be grease free and wiped dry. You can degrease the bowl by wiping it with a slice of lemon. Carefully separate the whites from the yolks, not allowing the yolks to get to the whites. You can use your hands, passing the whites among your fingers (in this case, you need to thoroughly wash your hands, grease is our enemy). Whisk egg whites with a mixer on low speed until soft peaks. While increasing the speed of the mixer, add sugar one teaspoon at a time. Sugar serves as an abrasive that helps the merengue whisk better. Whisk until fluffy, snow-white, glossy. There is no need to wait until the sugar is completely dissolved. To check how much the sugar has dissolved, you can take the egg whites mixture and rub it between your fingers to make sure that the sugar is practically dissolved. It's important not to over-beat the whites. It is easy to check if meringue is ready: if you turn the bowl over, the mixture remains in it.
- Put a pastry bag with a nozzle on the glass. Using the gel food colouring, draw vertical lines from the nozzle and up with a brush. The more lines and the thicker they are, the more intense the meringue colour will be. It's important not to overdo it. Fill the bag with the egg whites mixture and pipe the meringues on a silicone sheet or parchment paper. It is advisable to make the meringues the same size so that the drying time coincides. Reduce the temperature in the oven to 100˚С, put the meringues and dry them for 2-3 hours until tender. Drying time depends on many factors, including humidity in the room. You can turn off the oven after 3 hours, slightly open the oven door, and leave the meringues overnight. You can make them in advance, they can be stored in an airtight container for up to one month.
- Pour a pinch of saffron with 1 tsp warm water. Let it brew. Sprinkle the raisins with flour and mix. Remove the zest from the lemons. Set aside.
- Heat the milk a little (no higher than 45°C, otherwise the yeast will die), dissolve the yeast in it, add a spoonful of sugar and a spoonful of flour, stir and leave in a warm place to prove.
- Separate the yolks from the whites (you can use the yolks left over from the meringue). Melt the butter. Beat the yolks with sugar until white, pour in warm (not hot butter), mix well. Add vanilla, saffron water, and lemon zest.
- Check the dough starter: it should be growing, increasing in volume. If the yeast is working, add the dough to the egg-butter mixture and mix. If not, then you need to make a new dough starter. Sift flour and add to egg-butter mixture. Start kneading the dough. Add raisins midway through the process. If you knead the dough with your hands, it will take at least an hour. At first, the dough will be thin, but don't be tempted to add flour. As you knead, the dough will become more elastic and come off your hands. It will still stick to your hands, but it will become denser and more even and begin to take shape. Cover the dough with cling film and leave in a warm place. Proving may take 3 to 7 hours. The dough is buttery and will rise slowly. The mass will increase by about a third. The cling film on the container will swell slightly from carbon dioxide - this means that the process is underway.
- Heat oven to 160˚С. Butter the ramekins and sprinkle with semolina. When the dough has increased by one third, knead it and pour it into the ramekins to about two thirds full. Place the ramekins with dough in a warm place for proving. The dough should increase by another third. Bake the paskas for 40-50 minutes. Take out the paskas from the ramekins and put them on a cooling rack.
- Pour the icing sugar into a high container. Add egg whites and lemon juice. Whisk with a mixer on high speed. The icing should be thick and not lose shape. If you would like to make the drip icing, reduce the amount of sugar, and add it gradually while whisking to adjust the thickness.
- When the paskas have cooled, top them with icing. Decorations (meringues, flowers, and sugar pearls) should be places while the icing hasn’t set. Paskas stay fresh for a very long time. They are most delicious on the second or third day after baking.